Category: "Other"

Using bison and flex with CentOS 8
Nov 27th
This isn't actually useful, it's here to remind me what I did ... if you use this, be sure to start with the github link. Also - I forgot about the installation. Install stuff.
Tools
- Bison - Bison is a general-purpose parser generator that converts an annotated context-free grammar into a deterministic LR or generalized LR (GLR) parser employing LALR(1) parser tables. (Generates C++)
- Flex - flex is a tool for generating scanners: programs which recognize lexical patterns in text. (Tokens).
- gcc - The GNU Compiler Collection includes front ends for C, C++, Objective-C, Fortran, Ada, Go, and D, as well as libraries for these languages (libstdc++,...). GCC was originally written as the compiler for the GNU operating system. The GNU system was developed to be 100% free software, free in the sense that it respects the user's freedom.
First
Does everything you do work the first time? Probably not. Start with someone else's stuff.
https://github.com/meyerd/flex-bison-example
$ bison -d calc.y
$ flex calc.l
$ gcc calc.tab.c lex.yy.c -o calc -lm
$ ./calc
Write a little bash script because you're going to have to run your stuff, over and over
#!/bin/bash
if [ $# != 1 ];
then
    echo -e "\nUsage $0 <filename>\n\tExample: $0 one\n";
    exit 1;
fi;
bison -d "$1.y"
flex -l -o "$1.c" "$1.l"
gcc -lm "$1.tab.c" "$1.c" -o "$1"
./$1
Files
The two files I created are attached, with .txt extensions.
The goal was to create a little assembler. In this case, the assembler supports three commands - LOAD, CLEAR and STORE. It's interactive, meaning it behaves as an interpreter, rather than creating 'machine' code.
It was a good exercise and I like the example.
Double precision floating point format decoder - C++
Aug 7th
Notice: Undefined index: image_alt in /var/www/html/b2evolution/inc/_core/_misc.funcs.php on line 9311
This was fun to do, but I can't remember why I decided to do it
The screenshot (below) is different than the actual source code, but you get the idea.
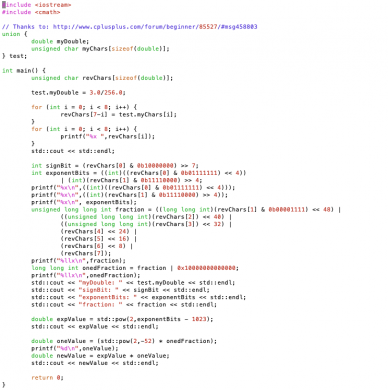
Ref: https://en.wikipedia.org/wiki/Double-precision_floating-point_format
Quiz analysis with Canvas API
Nov 28th
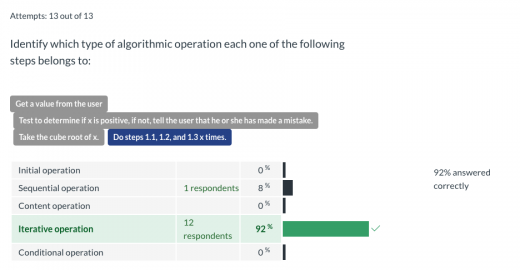
I wanted to perform Item Analysis on quiz results under Canvas LMS.
Without working very hard.
I used a Web Inspector to look at the traffic, found the URL for quiz statistics and started trying to use curl to authenticate in and get the data.
When it didn't work right away, I Googled and found the Canvas REST API documentation. I spent a little time roaming through and found ...
curl -H "Authorization: Bearer REDACTED" https://canvas.instructure.com/api/v1/courses/:course_id/quizzes/:quiz_id/statistics
A single curl request delivers all the stats for a quiz. Absolutely excellent.
To create a .csv of the data, I used PHP, then translated it to Node.js
<?php
// The JavaScript code handles more types of questions - refer to that if you are planning to use this code
$shortopts = "f:q:";

$longopts  = [
    "file:",
    "questions:"
];
$options = getopt($shortopts, $longopts);

$filename = $options['f'];
if (is_file($filename)) {
        $questionList = $options['q'];
        $questions = explode(',', $questionList);
        if (count($questions) < 1) {
                die('No questions');
        }
} else {
        die('File not found');
}

$keys = [ 'responses', 'answered', 'correct', 'partially_correct', 'incorrect' ];
$assessmentData = json_decode(file_get_contents('stats.json'));
if (json_last_error() === JSON_ERROR_NONE) {
        $quizStatistics = $assessmentData->quiz_statistics[0];
        echo 'question,'.implode(',', $keys).PHP_EOL;
        foreach ($questions as $q) {
                $data = getData($keys, $q, $quizStatistics->question_statistics[$q]);
                echo implode(',', $data).PHP_EOL;
        }
}

function getData($keys, $question,$data) {
        $lineData = [ $question ];
        foreach ($keys as $k) {
                $lineData[] = isset($data->$k) ? $data->$k : 0;
        }
        return $lineData;
}
"use strict";

// Thanks to: https://stackabuse.com/command-line-arguments-in-node-js/
// Thanks to: https://flaviocopes.com/how-to-check-if-file-exists-node/
// Thanks to: https://code-maven.com/reading-a-file-with-nodejs

const fs = require('fs');

const path = process.argv[2];
try {
	if (fs.existsSync(path)) {
		let questionList = process.argv[3];
		let questions = questionList.split(',');
		if (questions.length < 1) {
			throw new Error('No questions');
		}
		fs.readFile(path, 'utf8', function(err,contents) {
				let csvData = createCSVData(contents,questions);
				process.stdout.write(csvData + '\n');
				});
	} else {
		throw new Error('File not found');
	}
} catch (err) {
	console.error(err);
}

function createCSVData(fileData,questions){
	const keys = [ 'responses', 'answered', 'correct', 'partially_correct', 'incorrect' ];
	let csvData = '';
	let assessmentData = JSON.parse(fileData);
	if (assessmentData !== null && typeof assessmentData !== "undefined") {
		let quizStatistics = assessmentData.quiz_statistics[0];
		csvData = 'question,'+ keys.join(',') + '\n';
		questions.forEach((q) => {
                                q--; // questions are zero based
				let data = getData(keys, q, quizStatistics.question_statistics[q]);
				csvData += data.join(',') + '\n';
				});
	}
	return csvData;
}

function getData(keys, question, data) {
	let lineData = [ question ];
	keys.forEach(k => {
		let val = 0;
		if (typeof data[k] !== "undefined") {
			val = data[k];
		} else {
			if (typeof data[k + '_student_count'] !== "undefined") {
				val = data[k + '_student_count'];
			}
		}
		lineData.push(val);
	});
	switch (data.question_type) {
		case "essay_question":
			data.point_distribution.forEach(o => {;
				switch (o.score) {
					case data.full_credit:
						lineData[keys.indexOf('correct')+1] = o.count;
						break;
					case 0:
						lineData[keys.indexOf('incorrect')+1] = o.count;
						break;
					default:
						lineData[keys.indexOf('partially_correct')+1] += o.count;
						break;
				}
			});
			break;
		case "true_false_question":
		case "short_answer_question":
			data.answers.forEach(o => {;
				if (o.correct === true) {
					lineData[keys.indexOf('correct')+1] = o.responses;
				} else {
					lineData[keys.indexOf('incorrect')+1] = o.responses;
				}
			});
			break;
		default:
		    	//console.log(question + ". "+data.question_type);
			//console.log(data);
	}
	return lineData;
}
Sample output:
question,responses,answered,correct,partially_correct,incorrect
2,11,11,3,4,6
Ref: https://canvas.instructure.com/doc/api/
Ref: https://canvas.instructure.com/doc/api/file.oauth.html#manual-token-generation - get a user auth token
Raspberry Pi - web page as a sign (or kiosk)
Sep 1st
TL;DR
This is the stuff that lets you get the Pi up and running - meaning displaying a web page. It won't solve all your problems.
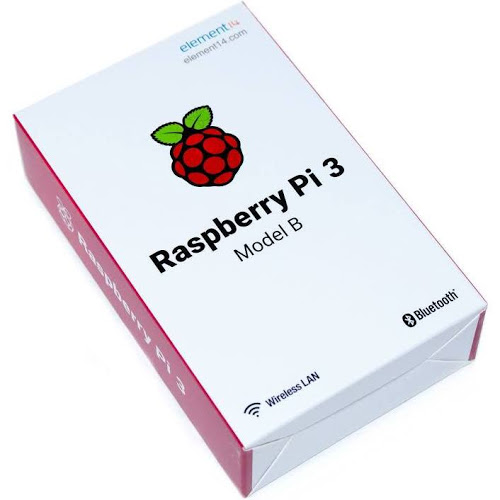
Raspberry Pis are about the size of a deck of cards and extremely easy to work with. If all you need is to display a web page, they're great.
Setup steps for Pi
Setup WiFi
You're probably going to need an internet connection. This describes how to set up WiFi. If you're using a wired connection, you can skip this.
I apologize for providing a link, but it is the best way to explain what needs to be done. You'll figure it out.
Ref: https://www.raspberrypi.org/documentation/configuration/wireless/wireless-cli.md
sudo raspi-configSet the locale and hostname of the Pi
This is important for several reasons:
- You can use the hostname to identify the Pi to the web page you're displaying
- The locale affects the keyboard layout. If you don't set it properly, when you press a key, you might not get what you want.
- You need to set the timezone for the Pi, or it won't know what time it is.
You will need to reboot after this
Install vim
Okay, this isn't strictly necessary and if you prefer to use nano or some other editor, it's fine.
sudo apt-get install vimScreensaver
You probably don't want the display to shut off. The easiest way to do this is to use xscreensaver.
Install xscreensaver, so it is easy to shut off the screensaver
sudo apt-get install xscreensaverNow shut off the screensaver using the GUI
Make the Pi open a browser in kiosk mode
Set it up to load the browser and display the sign on boot
Add this command as the last line in ~/.profile.
chromium-browser --kiosk --window-position=0,0 --window-size=1920,1080 https://www.example.com?kiosk=`hostname`Set the window size to match your monitor. Set the URL to work with your site.
Test it out a few times on the command line to make sure it does what you want.
Ctrl-Alt-F2 escapes from kiosk mode, default Pi username/password is pi/raspberry. To start the desktop (if you cancel out of kiosk mode, you may need this), use startx
Add a cron job to shut the Pi down
If you're using the Pi to run a sign in the office, there's no point in having the sign display during off hours. Turn it off.
Create a file called: /etc/cron.d/stop
0 19 * * * root /sbin/shutdown -h now > /dev/null 2>&1Final thoughts
- Be sure to consider authentication/security. Since these will probably be limited access, you can use the IP address to identify it. Only trusted sources. Or you may argue public access is fine. It's a sign, right? Anyway - be sure to consider whether you are willing to allow access to the web page from sources other than the sign.
- The Pi doesn't turn on automatically. You need to choose a way to turn the sign on, or never shut it off. It can be a simple switch, a timer, a remote controlled outlet, a smartphone control, or ... http://www.uugear.com/witty-pi-realtime-clock-power-management-for-raspberry-pi/ (which looks like the most fun)
- You may want to install Teamviewer so you can support it remotely.
This post courtesy of Game Creek Video.
iPhone "Incorrect Password" WiFi
Apr 25th
If your iPhone is not connecting to your NetGear WNDR4000 WiFi router and the message is "Incorrect password", check the access control settings on the router.
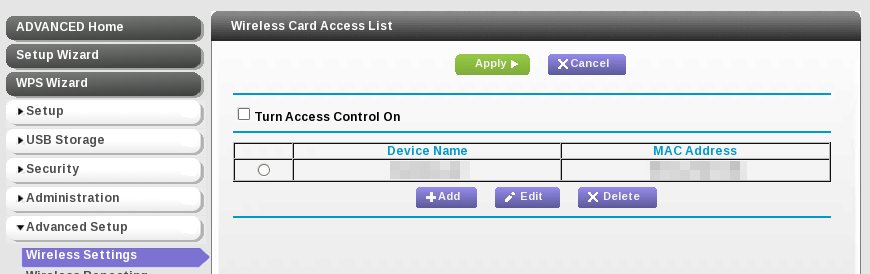
I made a change to the router configuration and managed to enable access control which allowed only one device to log in.
Oops